By: Serena Juchnowski
The sitting position in high power service rifle competition is more stable than the standing position, but it still requires discipline and attention to detail.
In the National Match course for high power service rifle, the 200-yard rapid fire stage follows the slow-fire standing stage. Most competitors choose to shoot rapid-fire at 200 yards from the sitting position, while a few may prefer kneeling. Both are permitted.
Competitors must fire ten rounds in a time period of sixty seconds with a magazine change. These ten rounds should be split between two magazines, with two rounds in one magazine and eight in another. The two-round magazine must be loaded and fired first, then ejected and switched with the eight-round magazine.
In some matches, competitors fire their rapid immediately after the standing stage, while in other matches, they may have to pull their gear off of the line and bring it on again after all competitors (except those in the pits) fire the standing stage. There are two primary reasons for this second method.
One, all competitors on the firing line fire the standing stage before anyone shoots rapid-fire sitting. This method helps in equalizing the conditions for the competitors. Second, the time between standing and sitting allows competitors with match rifles to make adjustments to their stocks and adapt their rifles for the next position.
For service rifle shooters, not as much time is needed, as there are no adjustments to make other than unhooking the sling from the rifle and maybe adjusting the stock. While permissible service rifle stocks only adjust in length, match rifle stocks can have adjustable butt plates, cheek pieces, and many other fine-tuned adjustments.
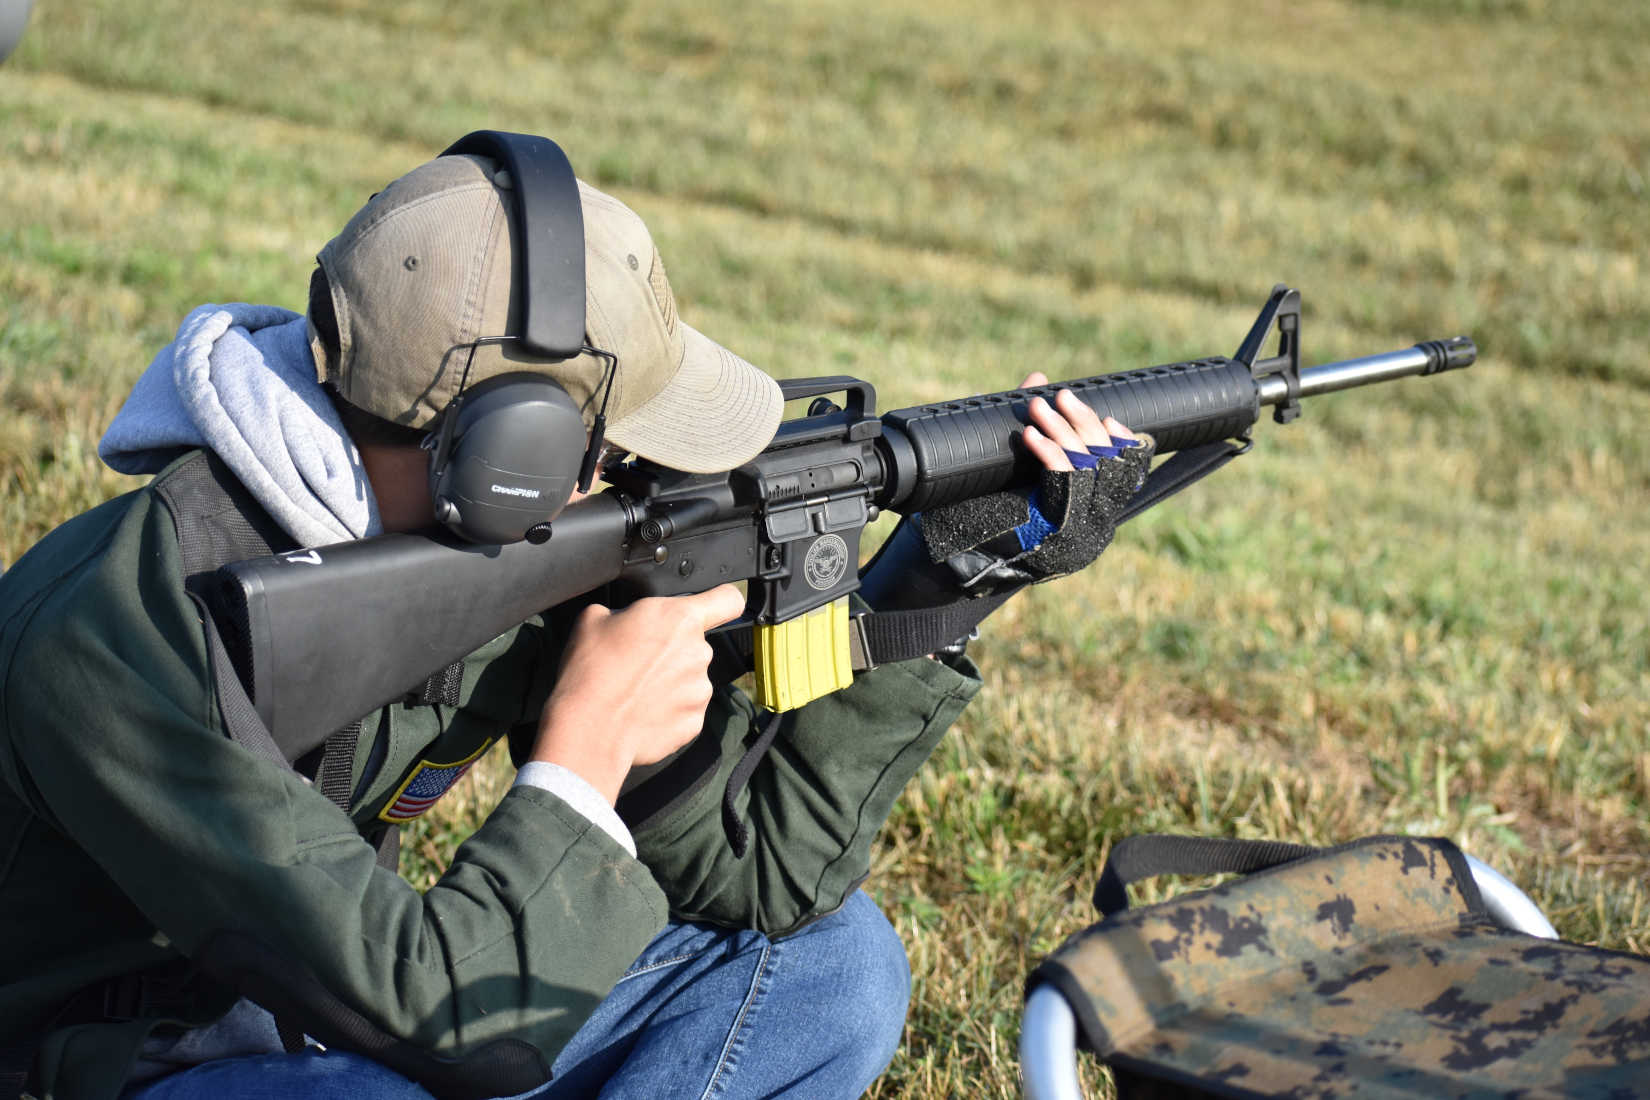
This article will focus on service rifle and the sitting position. Every person shoots sitting slightly differently because each person’s body is different. The two most popular styles are crossed legged and crossed ankle. Crossed ankle is more common among those individuals with knee problems, as it places less stress on the knees. As in the standing position, natural point of aim and consistency are of utmost importance.
The Crossed-Legged Sitting Position
One should sit down “Indian style,” or with the legs crossed facing the target. Once you have done this, and you have your jacket on, put your sling around the arm of your non-firing hand and don your glove. Once you have tightened your sling, put the rifle into your shoulder.
You may discover that the sling is too tight or too loose. If so, take the rifle out and repeat the process until you find a comfortable and stable sling setting. With a leather sling, one can return to the number of the notch he or she finds works best for his or her position. With a web sling, competitors may choose to make a reference mark on the sling for sitting and another marked for prone, but it still may require minute adjustments to be comfortable. The sling should be taut.
Next, find your position. The sling should be attached to your arm and to the rifle by this point. With an empty chamber indicator in the rifle, start experimenting with various elbow placements. It is recommended that one should not have “bone on bone,” for example, having the elbow right on top of the kneecap. This positioning leads to extra movement and sliding. Pay attention to your cheek weld, where the rifle is in your shoulder, and how you look through the sights/scope on your rifle.
All of these factors can greatly alter where a bullet lands, even with a good zero. The zero is only consistent if you maintain the same position you had when you determined that zero.

There is no “one” position that works for everyone. It is generally advised to put the butt of the rifle high in one’s shoulder, in the pocket. If you are “double jointed” or have loose joints, make sure the buttstock is not in a place that will hurt your shoulder. Some people find it beneficial to unbutton the first button of their pants or to remove or unlatch their belt. This allows for easier breathing.
Once you have a place for the rifle in your shoulder and a solid foundation for your elbows, have someone push gently on your shoulder (the one with the buttstock in it) to mimic the recoil of the rifle. If the position is tight and solid, the shooter should move slightly backwards then rock forward into position and steady quickly. If this does not happen, try readjusting the sling and changing some things in the position.
Once one has followed the process above, it is time to check natural point of aim. Look through the sights/scope at your target and close your eyes. When you open them, you should be centered on the target. If not, you need to scoot left or right in order to achieve this.
It is advisable to shoot more parallel to the target rather than perpendicular to it. In other words, shooting with your shoelaces facing towards the target rather than away from it. This is not to say that you should not be at an angle to the target, only that you should avoid the two extremes. The reason for this positioning is so that the recoil of the rifle goes fully into your shoulder, not just a part of it. With more surface area and weight to push back against, the rifle should settle faster and natural point of aim should stay more consistent.
Once you establish a good natural point of aim, and it is safe to do so, remove the empty chamber indicator and insert an empty magazine or a single loading sled. Shut the bolt and dry fire. Practice taking the rifle out of your shoulder and returning it to the same location. Yank the charging handle back to reset the trigger. Be sure to familiarize yourself with the weight and feel of the trigger.
You should have two loaded magazines next to you for when the three-minute preparation time has ended. It is also advisable to load an extra magazine with eight rounds in it to have off to the side in case you run into a jam or magazine failure. There are various colloquial terms for this extra magazine including an “oh sh** mag” and “panic mag.” Regardless of what you call it, you are disqualified if you do not shoot two rounds, change magazines, and shoot eight rounds out of a different magazine before sixty seconds has elapsed.
Be sure to count your rounds as you fire them in case you did not load the correct number. If you loaded more than two in the first magazine, be sure to eject it before firing a third shot to avoid disqualification.
Starting the String
The National Rifle Association (NRA) and the Civilian Marksmanship Program (CMP) have slightly different rules when it comes to rapid-fire strings. In NRA sanctioned matches, competitors start from the sitting position and load on an open bolt. In paper target matches, pit pullers will run the targets to “half-mast” (halfway up) to signal that the three minutes of preparation time has ended and that when the targets go up, it is clear for competitors to load and fire. On electronic target matches, shooters must listen for the range commands “Targets” and “Cease Fire.”
In CMP sanctioned matches, competitors start from the standing position. They can establish their natural point of aim and dry fire during preparation time, but must stand up before firing. A line officer will instruct competitors to “stand” and “load” a magazine of two rounds on a closed bolt. When the targets appear or when the command “targets” is given in electronic target matches, competitors will drop down, charge the bolt, and begin firing.
One should always take a second to check natural point of aim before firing and should always have the bolt pointed below the targets when he or she closes the bolt. This is so that rounds do not accidently leave the range.
Crossed-Legged Position
The difference between crossed ankle and crossed leg is in the name. In the crossed ankle positon, competitors sit with their legs extended and their ankles crossed.
The legs will not be straight, but knees will be facing at an angle away from the body. Competitors may place their elbows on top of or slightly inside the pockets formed by the kneecap. This positioning often places less stress on the knees and is often more comfortable for competitors with knee problems. The same rules of thumb regarding sling tightness and natural point of aim apply here as before.
Breathing
It is imperative that one pays attention to his or her breathing during rapid fire.
Not breathing at all depletes the eyes of oxygen and may compel a competitor to fire the rounds as quickly as possible so as to not run out of air. There is enough time during a sitting rapid fire string to breathe between each shot. There are several ways to do this. Some choose to breathe in, fire the shot, then breathe out. Others choose to fire after they expel a breath.
The most popular method and what I have found the most effective method is to take in a breath, let it half out, and fire during that natural pause. During the recoil you expel the rest of the breath. It is incredibly important to stop breathing when you fire the shot. Many new shooters will find that their shots are vertically stringing – this may be because they are firing when they are breathing in or breathing out, which changes the shot elevation.
There are many little tips more advanced shooters may find helpful, but for the beginning or intermediate shooter, it is best to focus on one thing at a time. Shooters should first focus on establishing a good position and shooting a good group (group of shots in one spot on the target). After the competitor is comfortable with how to use a sling and the timing of the rapid-fire, new ideas and possible things to try can be introduced.
Serena Juchnowski is a high power service rifle competitor and regular contributor to Junior Shooters magazine, writing from Ohio. Contact her at [email protected].